#Hyper-V Powershell Commands
Explore tagged Tumblr posts
Visit Tumblr Blog
Explore Tumblr blogs with no restrictions, modern design and the best experience.
Last Seen Tumblr Blogs


Fun Fact
Tumblr has a low social media market share in South America.
Text
Hyper-V Powershell Commands
Merhaba; bu yazımda sizlere çok popüler olan Hyper-V Powershell Commands konusundan bahsedeceğim. Günümüzde sanallaştırma platformalarını neredeyse tüm şirketler kullanmaktadır. Hyper-V de Microsoft’un bir sanallaştırma yazılımıdır. Burada sıklıkla kullanılan Powershell üzerinden yönetim komutlarını sizler için özetleyecğim. Hyper-V için PowerShell komutlarını detaylı olarak açıklayalım.…

View On WordPress
0 notes
Quote
Comment essayer Windows 10X Comment essayer Windows 10X Avez-vous entendu parler de la nouvelle version de Windows 10? Voici comment le tester maintenant. Qu'est-ce que Windows 10X? Windows 10X est la nouvelle version du système d'exploitation Windows 10, conçue principalement pour les appareils à deux écrans. Le lancement de cet OS est actuellement prévu en 2021. Comment tester Windows 10X windows-10x-home Vous pouvez essayer Windows 10X à l'aide de l'émulateur Microsoft. Il convient de noter que le travail sur la version continue et que les assemblages préliminaires sont principalement destinés à permettre aux développeurs de commencer à assurer la compatibilité des applications. Vous pouvez rencontrer des erreurs, des plantages et d'autres problèmes. 1. Installation de l'émulateur Microsoft Vous devez d'abord installer Microsoft Emulator. Il est gratuit et disponible sur le Microsoft Store. Téléchargement: Microsoft Emulator pour Windows 10 2. Téléchargez l'image de l'émulateur Windows 10X windows-10x-emulateur Ouvrez maintenant l'émulateur Microsoft. Il commencera automatiquement à rechercher une nouvelle version du système d'exploitation dans le Microsoft Store. Sélectionnez la dernière version, puis cliquez sur Installer. Vous devrez entrer le mot de passe de votre compte Microsoft pour confirmer le téléchargement et accepter le CLUF. Ensuite, l'image Windows 10X démarre. 3. Vérifiez si Hyper-V est installé Avant de démarrer Windows 10X, assured-vous d'avoir installé et exécuté Windows Hyper-V. Ouvrez une invite de commande avec des privilèges d'administrateur. Entrez ensuite la commande suivante: systeminfo.exe Faites défiler vers le bas et recherchez la section Configuration requise pour Hyper-V. Si les exigences disent «Oui», vous pouvez passer à la section suivante 4. Si les exigences disent «non», lisez la suite. Ouvrez PowerShell avec des privilèges d'administrateur. Entrez la commande: DISM / En ligne / Enable-Feature / All / FeatureName: Microsoft-Hyper-V Une fois la commande terminée, redémarrez le système. Une fois votre système redémarré, vous trouverez des options pour Hyper-V dans le menu Démarrer.
http://lemonde01net.blogspot.com/2020/07/windows-10x-comment-essayer.html
1 note
·
View note
Text
An Introduction to Windows 2008 Hyper V

Well the closing model of this MS solution has been produced, people today have been downloading it considering that late 2008. Regrettably we are not chatting about the new avatar process for MS's prosperous console program the 360. No, we are speaking about Windows Server 2008 Hyper V. Late last year, I went to a technet server keynote in London town, MS CEO Steve Ballmer gave a speech regarding the merchandise of MS hyper v server 2008 to a group of seven hundred in addition IT market pro's. In case you have any kind of questions with regards to wherever and also the best way to employ esxi vs hyper-v, you can contact us on our internet site. We managed to get a preview of the characteristics of hyper v. Things this kind of as migration and memory distributions were covered. I need to say virtualization is a groundbreaking technology that has been all over, humorous plenty of for about forty several years! Now I know that this might not audio so thrilling to some of you, extra so considering that as far as virtualization of running techniques is anxious, VMware has very substantially dominated the market place for a selection of yrs, but I recommend that you delve further into the know-how and study extra about the several features and main improvements Hyper-V now presents. Virtualization it is an all-environmentally friendly remedy that enables you to help save not only on electrical power charges for powering and cooling your servers, but also on hardware, overhead and all round operational expenses by consolidating your servers and community storage. Another explanation why you may well want to search into virtualization is hardware underutilisation. Logs of IT overall performance reveal the average server utilisation of CPU is roughly 7 percent. But when you operate a few digital servers you seamlessly maximise useful resource outage without having neglecting overall performance. This is the circumstance with a ratio of 1:ten, in other phrases you run ten virtual servers on a solitary actual physical server. A different new and enjoyable product introduced by Microsoft is devoid of a doubt Server Main. This is a fairly bare operating method which is stripped of the .Web framework and hence can only operate certain roles that do not count on the framework this kind of as Domain Name System (DNS), Dynamic Host Configuration Protocol (DHCP), Community Load Balancing (NLB) and other standard roles. At the stop of the day it is nonetheless a really potent operating technique that can normally be maintained and configured by the command line interface applying MS PowerShell. I am assured IT administrators will always obtain this total electricity valuable for their day by day duties. If hyper v is anything you would contemplate practical for your self or your organization then it wise to research the a lot of hyper v education courses out there to display you the ropes.
1 note
·
View note
Text
Enabling Hyper-V Services for Ubuntu to allow for Native SSH over WINDOWS 10/11 Networking SOCKS
Have you ever needed to SSH into a local virtual machine while Cisco AnyConnect was redirecting all networking traffic? Check this solution out!
Today I had the need to be able to connect to my Ubuntu VM on Hyper-V without having to specify the randomly generated IP address and also be able to continue to use it for development while Cisco AnyConnect was redirecting all traffic for my computer. I happened across a pretty great command called “hvc.exe” that can be used in Powershell which allows you to interact with a Virtual Machine…
View On WordPress
0 notes
Text
Melty map mathmod v.0.9.12

#Melty map mathmod v.0.9.12 update#
#Melty map mathmod v.0.9.12 upgrade#
#Melty map mathmod v.0.9.12 windows#
#Melty map mathmod v.0.9.12 upgrade#
Why should I upgrade the virtual machine configuration version?
#Melty map mathmod v.0.9.12 update#
Windows 10 Anniversary Update (version 1607) Windows 10 Creators Update (version 1703) Windows 10 Fall Creators Update (version 1709) Windows 10 April 2018 Update (version 1803) Windows 10 October 2018 Update (version 1809) Windows 10 November 2019 Update (version 1909) Windows 10 October 2020 Update (version 20H2) Windows 10 November 2021 Update (version 21H2)
#Melty map mathmod v.0.9.12 windows#
To get more information on Semi-Annual Channel versions of Windows, visit the following pages for Windows Server and Windows. The following table lists the VM configuration versions for hosts running a Semi-Annual Channel version of Windows. Supported VM configuration versions for Semi-Annual Channel hosts The following table lists the VM configuration versions for hosts running a long-term servicing version of Windows. Supported VM configuration versions for long-term servicing hosts If the VM's configuration version is not listed as supported for your Hyper-V host OS in the table below, you either have to upgrade the VM configuration version to a newer version or create a new VM of the same generation using the existing virtual hard disks before you can start the VM. Typically, this means that you can import a virtual machine to a Hyper-V host running a newer version of Hyper-V, but you cannot import a virtual machine created on a newer version of Hyper-V to an older version of Hyper-V. You can only import a virtual machine if the Hyper-V host supports that configuration version. For example, to create a virtual machine named "WindowsCV5" with configuration version 5.0, run the following command: New-VM -Name "WindowsCV5" -Version 5.0 If you need to create a virtual machine that you can move to a Hyper-V Host that runs an older version of Windows, use the New-VM cmdlet with the -Version parameter. To see which virtual machine configuration versions your Hyper-V Host supports and what the default is, run the following command. When you create a virtual machine, it's created with the default configuration version. Using the PowerShell cmdlet Get-VMHostSupportedVersion you can see what virtual machine configuration versions your Hyper-V Host supports. Supported virtual machine configuration versions Run the following command where vmname is the name of the virtual machine. To upgrade the virtual machine configuration version by using Windows PowerShell, use the Update-VMVersion cmdlet. If this option isn't available for the virtual machine, then it's already at the highest configuration version supported by the Hyper-V host.
Select Action > Upgrade Configuration Version.
Shut down the virtual machine in Hyper-V Manager.
Step 2: Upgrade the virtual machine configuration version You can also see the configuration version in Hyper-V Manager by selecting the virtual machine and looking at the Summary tab. Run the following command to get the versions of your virtual machines.
Right-click Windows PowerShell and select Run as Administrator.
On the Windows desktop, click the Start button and type any part of the name Windows PowerShell.
Step 1: Check the virtual machine configuration versions
You're sure that you won't need to move the virtual machine back to a Hyper-V host that runs a previous version of Windows or Windows Server.įor more information, see Cluster Operating System Rolling Upgrade and Perform a rolling upgrade of a Hyper-V host cluster in VMM.
You upgrade the cluster functional level.
You upgrade your Hyper-V hosts to the latest version of Windows or Windows Server.
Make the latest Hyper-V features available on your virtual machines by upgrading the configuration version. Applies to: Windows Server 2022, Windows 10, Windows Server 2019, Windows Server 2016
0 notes
Text
How to Enable and Disable Hyper-V in Windows 11
Hyper-V is a free built-in virtualization software in both Windows client and Windows Server operating systems.
On the client-side Windows, Hyper-V is available as an optional feature on all editions except the Home edition. You can add Hyper-V feature even on the Home edition of Windows 11, but, by default, it not available.
If you are a Windows user, you no longer need to download and pay for a third-party virtualization software such as Oracle Virtual Box, VMware, and so forth. Instead, Hyper-V is free, and an industry leading choice for you with user-friendly interface and advance features.
Also consider that there are requirements that your system should meet in order for you to use Hyper-V. It is true with other virtualization software.
That said, the below article guides you how to enable and disable Hyper-V on your Windows 11 system. The article discusses three interesting methods to do so: Windows Settings, Command Prompt, and, PowerShell.
0 notes
Text
How to perform storage migration in a Hyper-V failover cluster
Case
You have a Hyper-V cluster and you need to migrate virtual machine disk files and other disk-based clustered objects (such as paging files and snapshots) from an old storage repository to a new storage repository. This could mean migration between storage LUNs of the same storage system or between storage LUNs of different storage systems which are attached to the same hypervisor cluster. The migrated virtual machine disks may be of type .vhd, .vhdx, .vhdx shared or .vhds (VHD Set).
Solution
For best practice designs of Hyper-V clusters, you should review the following article: https://stefanos.cloud/kb/how-to-deploy-a-hyper-v-cluster-with-powershell/. Also you can purchase my e-book on Hyper-V cluster design best practices. https://stefanos.cloud/blog/windows-failover-clustering-design-handbook/ To migrate virtual machine storage, you should use the Hyper-V cluster storage migration feature. Via Failover Cluster Manager Follow the steps below in the Failover Cluster Manager console. - Open the Hyper-V cluster manager console and click on the VM whose storage you need to migrate between cluster disks (volumes). Right-click on the VM and choose command "Move --> Virtual Machine Storage".

On the upper section, choose either the entire source VM or some of the associated storage files which you wish to migrate (source). Then drag and drop the selected rows to the lower section into the target folder of the target cluster volume (target). After completing the drag and drop operation, you should see a summary of the before (source) and after (target) storage repository for the dragged storage entities, as shown in the example below.
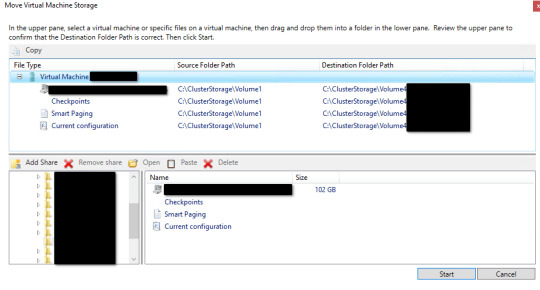
When you are ready click "Start" and observe the storage migration status in the Failover Cluster Manager console as well as by observing network traffic in the Windows File Explorer, from the source storage volume to the target volume. The storage migration initiation should be shown inside the Failover Cluster Manager, next to the VM record whose storage migration has started.

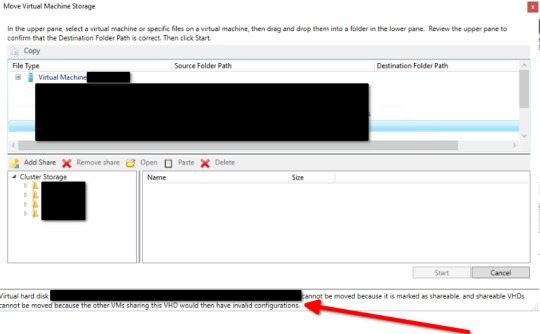
You should repeat the above steps for all virtual machines whose storage you wish to migrate. Via Powershell You can achieve the same Hyper-V virtual machine storage migration with the following example Powershell cmdlet. Move-VMStorage "SourceVM" -VirtualMachinePath D:MyVMsConfig -SnapshotFilePath D:MyVMsSnapshots -SmartPagingFilePath D:MyVMsSmartPaging -VHDs @(@{"SourceFilePath" = "C:MyVMsDisk1.VHDX"; "DestinationFilePath" = "D:MyVMsDisksDisk1.VHDX"}, @{"SourceFilePath" = "C:MyVMsDisk2.VHDX"; "DestinationFilePath" = "D:MyVMsDisksDisk2.VHDX"}) Storage migration of shared vhdx or vhds disks If you try to migrate a storage disk which is configured as a shared disk (either in .vhds VHD Set or .vhdx shared format) you will encounter the following blocking error and the storage migration will not be able to continue. Virtual hard disk C:ClusterStorage.vhdx cannot be moved because it is marked as shareable and shareable VHDs cannot be moved because the other VMs sharing this VHD would then have invalid configurations.
Shared disks are part of a guest WFC cluster If the shared disks to be migrated to another storage LUN are part of a Windows Failover Cluster (WFC) in a guest cluster fashion, for example in a SQL Server guest cluster configuration, then you need to carry out the following steps. - Shut down both guest cluster nodes (hosts). - Remove the shared VHDX/VHDS file from the second guest cluster node.
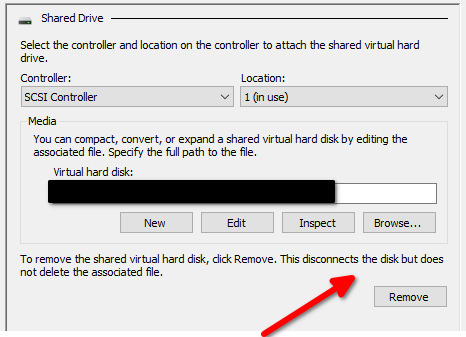
- Re-configure the VHDX/VHDS file to become a non-shared file. There is no official way to convert from VHDS to VHDX but only a workaround. Follow the steps below for this conversion from VHDS to VHDX.- Shutdown all the guest cluster VMs using the vhdx/vhds disk in question and detach the disk. - Copy/backup *.vhds and *.ahdx - Rename *.ahdx to *.vhdx - Use the Starwind V2V Converter too to convert to vhd or vhdx. - Re-attach the disk and verify functionality in your WFC cluster. - Power on the guest cluster node 1. - Perform the storage migration of the shared disks from guest cluster node 1. - Shut down node 1 again. - Re-configure the VHDX/VHDS file again to become a shared file and add it back to guest cluster node 2. - Power on both guest cluster nodes. Shared disks are not part of a guest WFC cluster In this case, you need to carry out the following steps. - Shut down the VM to which the shared disk in question is attached. - Remove the shared disk in question from the VM. This will detach the disk from the VM but it will not delete the actual disk file/data.
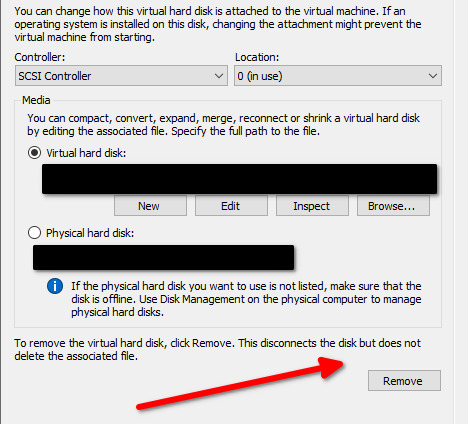
- Re-add the disk to the VM but this time choose the disk to be a non-shared disk.
- Power on the VM and perform the storage migration from the WFC console.
Sources
https://docs.microsoft.com/en-us/powershell/module/hyper-v/move-vmstorage?view=windowsserver2022-ps https://social.technet.microsoft.com/Forums/Azure/en-US/27ccf285-e5c3-4819-8f9c-82784b8ba71a/convert-vhdset-to-vhdx?forum=winserverhyperv Read the full article
#failovercluster#hyper-v#livemigration#Microsoft#Powershell#Storage#storagemigration#vhdset#vhds#vhdx#virtualmachines
0 notes
Text
Download windows update reset script windows 10

Reset Windows Update Client Settings Script · GitHub.
Reset Windows Update Agent script - 4sysops.
How to Reset Windows Update Components in Windows 10/11?.
Resetting Windows Update Components Either Manually or Automatically.
Windows Update Reset Windows Update in Windows 11.
Quick Fix: Windows update pending install (Windows 10 & 11).
Reset Windows Update with These Methods Now! - MiniTool.
Here's how you can reset Windows Update on Windows 10 to fix download.
(FIX) Windows update undoing changes after/before restart.
Factory Reset Windows 10 without user intervention.
What do I download as my Windows Update Reset tool?.
How to Fix Windows Update 0x80070012 on Windows 10 - A.
Fix Windows Update issues with Reset Windows Update Agent.
Reset Windows Update Client Settings Script · GitHub.
X Also changes the subnet randomly on every Hyper-V services startup Reset all graphics/display properties to default (can be done in Intel HD Graphics (or by pressing )) Ensure the lid is open and dock the laptop Click on Services The Windows 10 Anniversary Update includes a new feature that lets you see your network status at a glance. Sep 25, 2020 · Windows XP, Windows Vista, Windows 7, Windows 8, Windows 8.1, Windows 10 and Windows 10 Insider Preview. Infomation Development. The Reset Windows Update Tool brings changes in its latest version. Changes have been made to the code, it is now compatible with Windows 10 Creative Update and a change is proposed to make it a complete executable tool. Sooooo, below and HERE are the easy script to do this. Alternately, if you have PDQ Deploy, you can download our PDQ DEPLOY script directly from us HERE. If do you use this simple PDQ Deploy script you will need to.
Reset Windows Update Agent script - 4sysops.
STEP 2: Now run the batch script. Right-click on the file and select " Run as Administrator " option. It'll take a few seconds in executing the commands. That's it. Restart your computer and now you should be able to download and install all updates using Windows Update without any problem. Also Check.
How to Reset Windows Update Components in Windows 10/11?.
Troubleshoot problems updating Windows 10; Fix Windows Update; Automatically Reset Windows Update Components. I am sure there are many PowerShell scripts out there for resetting Windows Update, but Microsoft recommends Ryan Nemeth's Reset-WindowsUpdate.ps1 PowerShell script in its documentation. The script has been tested on the following. Press "Win + R," enter the below path and press the Enter button. This folder has all the files related to Windows updates. Open the "Download" folder, select all the files and delete all.
Resetting Windows Update Components Either Manually or Automatically.
A solution to how to install pending updates in Windows 10 is to enable the Automatic Updates immediate installation feature. Another good solution is to make some system changes by using a dedicated command-line app. A last resort measure is to run the Windows Update reset script. Sep 14, 2018 · Open System Properties. Reset the Windows Update Components. Delete temporary files in Windows. Open Internet Explorer options. Run Chkdsk on the partition Windows is installed. Run the System File Checker tool. Scan the image for component store corruption. Check the image for corruption or other issues. Perform repair operations automatically.
Windows Update Reset Windows Update in Windows 11.
How to Add Windows PowerShell Script to New Context Menu in Windows 10 A.ps1 script file is a text file that contains one or more Windows PowerShell commands or expressions. A.ps1 file will open with Notepad by default. To run a.ps1 file. An App Default was Reset Fix. Prevent Windows 10 Resetting File Associations to Movies & TV, Zune Music, Video, Photos, Edge, 3d Builder (Registry Fixes)... The undo scripts reverses these changes just fine, but I have decided to keep the changes and see if the irritating "App Default was Reset" messages go away.... Limit Windows Update. Instructions for running Windows update Reset Script in Windows 10/11. Download the Script into your computer (Link in the end) Select Keep if.
Quick Fix: Windows update pending install (Windows 10 & 11).
This script reset the Windows Update Components. Contribute to ManuelGil/Script-Reset-Windows-Update-Tool development by creating an account on GitHub.... 10.5.3.6 (06/07/2018) +500K Downloads Celebration. Requirements: Windows XP, Windows Vista, Windows 7, Windows 8, Windows 8.1 and Windows 10 Filename: ResetWUE Changes: Verification of.
Reset Windows Update with These Methods Now! - MiniTool.
This script will completely reset the Windows Update client settings. It has been tested on Windows 7, 8, 10, and Server 2012 R2. It will configure the services and registry keys related to Windows Update for default settings. It will also clean up files related to Windows Update, in addition to BITS related data. 5 Type the command below into the elevated Windows PowerShell or elevated command prompt, and press Enter. (see screenshots below) PowerShell -ExecutionPolicy Unrestricted -File " <Full path of ResetWindowsSearchBox.ps1 file> ". Substitute <Full path of ResetWindowsSearchBox.ps1 file> in the command above with the actual full path of the.
Here's how you can reset Windows Update on Windows 10 to fix download.
Download the Reset Windows Update Components Tool from this link here Download the Reset Windows Update Components Tool from this link here. In the menu, choose Windows Update and click on Next Try to update Windows again Panicked clicks don't do anything Restoring won't affect your personal files in your %UserProfile% folder, but it will.
(FIX) Windows update undoing changes after/before restart.
<#.SYNOPSIS Reset-WindowsUpdate.ps1 - Resets the Windows Update components.DESCRIPTION This script will reset all of the Windows Updates components to defaults..OUTPUTS Results are printed to the console. Future releases will support outputting to a log file. Click "Reset-WindowsUpdate.ps1" to download it and hit "Save". Edit the script. If you aren't using Windows' hidden administrator account, the script may throw up "Access Denied.
Factory Reset Windows 10 without user intervention.
Sounds like its time to rebuild your pc. If you want to try "one more thing", then my thoughts would be to: 1. Verify that you have plenty of free disk space. Step 1: Before we can delete the Update cache, we need to stop the Windows Update service. To do so, type S in Start menu search box and then press Enter key to open Services window. Step 2: Look for Windows Update service entry, double-click on the entry to open its properties dialog. Step 3: Under the General tab, click the Stop. Solution 2: Reset Windows Update components using a troubleshooter. If one or more Windows Update components on your computer are messed up and causing this problem, you need to reset them or you can try to repair them and that should take care of the problem. In order to reset Windows Update components on a Windows 10 computer, you need to.
What do I download as my Windows Update Reset tool?.
Apr 27, 2020 · C:\Scripts\ -accepteula -S -command C:\Scripts\wipe.ps1 Another way, which you can do remotely and without psexec (group policy for example), would be to create a scheduled task running as SYSTEM and executing the script.
How to Fix Windows Update 0x80070012 on Windows 10 - A.
First Download the Windows Update troubleshooter from Microsoft. Double click on the WindowsUpdateDiagnostic.diagcab file and start the troubleshooter. Now choose the Windows Update Option and click on Next. Next click on Try troubleshooting as an administrator. Now if there is an issue with the Components, the troubleshooter will automatically.
Fix Windows Update issues with Reset Windows Update Agent.
You can download the Reset Windows Update Agent script from the Microsoft Technet Gallery website. The script is compatible with Windows XP and newer versions of Windows including Windows 10 and Windows 10 Insider Preview versions. You need to unpack the archive first; it has a size of just 8 Kilobytes and an unpacked size of 38 Kilobytes. A. Resetting WU via the WU Agent. Open your default browser, visit the Microsoft Technet download page and download the Reset Windows Update Agent script. Downloading the Windows Update Reset agent; Once the download is complete, go ahead and extract the zip archive with a utility like WinRar, WinZip, or 7Zip and paste it into an easy to access location. Reset Windows Update Agent is designed to reset Windows Update, but it can also run diagnostics and fix other typically related issues with Winsock, registry and more. Video tutorial and Reset Windows Update Tool are also available. To get started with Reset Windows Update Agent extract all of the files and run ResetWUEng as administrator.
See also:
Eastwest Vst Crack
Tu Kal Chala Jayega Video Song Download
Plants Versus Zombies Two
1 note
·
View note
Link
MCSA Training Institute in Gurgaon provides you with complete practical sessions with both initial and advanced levels with 100% Placement. Our Microsoft Certified Solutions Associate training centers are equipped with lab facilities and excellent infrastructure.
0 notes
Text
Windows 10 enterprise enable windows store 無料ダウンロード.Windows 評価版ソフトウェア
Windows 10 enterprise enable windows store 無料ダウンロード.Windows 10 上に Hyper-V をインストールする

Windows 10 November 2021 Update.WSL のインストール | Microsoft Docs
Nov 02, · この記事の内容. 適用対象. Windows 10; Windows の各エディションでサポートされている機能について詳しくは、「Windows 10 エディションの比較」をご覧ください。 IT 担当者は、自分の組織のクライアント コンピューターに対して Microsoft Store へのアクセスを構成できます。 説明. Windows 10 Enterprise は、IT プロフェッショナルに以下の機能を提供することで、大規模および中規模の組織のニーズに対応するよう設計されています。. 最新のセキュ��ティ上の脅威からの最先端の保護. 柔軟な展開、更新、およびサポートの各種 Nov 23, · Windows ボタンを右クリックし、[アプリと機能] を選択します。 右側の関連する設定にある [プログラムと機能] を選択します。 [Windows の機能の有効化または無効化] を選択します。 [Hyper-V] を選択して、[OK] をクリックします。
Windows 10 enterprise enable windows store 無料ダウンロード.Windows に Docker Desktop をインストール — Docker-docs-ja ドキュメント
Dec 20, · To restore or reinstall Windows Store in Windows 10, start PowerShell as Administrator. Click Start, type Powershell. In the search results, right-click “PowerShell” and click Run as administrator. In the PowerShell window, type the following command and press ENTER Docker Desktop for Windows は Docker Hub からダウンロードできます。. このページは、Docker Desktop を Windows 10 Pro、Enterprise、Education にインストールするための情報です。. Docker Desktop を Windows 10 Home にインストールする情報をお探しであれば、 Windows Home に Docker Desktop をインストール をご覧ください。. Docker Hub からダウ Nov 02, · この記事の内容. 適用対象. Windows 10; Windows の各エディションでサポートされている機能について詳しくは、「Windows 10 エディションの比較」をご覧ください。 IT 担当者は、自分の組織のクライアント コンピューターに対して Microsoft Store へのアクセスを構成できます。
Docker Desktop for Windows は、Mirosoft Windows 用の Docker コミュニティ 版です。Docker Desktop for Windows は Docker Hub からダウンロードできます。. このページは、Docker Desktop を Windows 10 Pro、Enterprise、Education にインストールするための情報です。Docker Desktop を Windows 10 Home にインストールする情報をお探しであれば、 Windows Home に Docker Desktop をインストール をご覧ください。. Docker Desktop のダウンロード中に、 Docker Software End User License Agreement と Docker Data Processing Agreement に同意ください。.
Docker による Windows 用 Docker Desktop のサポートは、Microsoft の Windows 10 オペレーティングシステムに対するサポート・ライフサイクルに基づきます。詳細な情報は Windows ライフサイクル・ファクトシート を御覧ください。. Docker Desktop のインストールに含まれるのは、 Docker Engine 、 Docker CLI クライアント、 Docker Compose 、 Notary 、 Kubernetes 、 Credential Helper です。.
Docker Desktop で作成したコンテナやイメージは、インストールしたマシン上の全ユーザ間で共有です。これは、すべての Windows アカウントが同じ仮想マシンでコンテナを構築・実行するからです。ただし、Docker Desktop WSL2 バックエンドを使用する場合は、ユーザ間でコンテナやイメージの共有ができないのでご注意ください。. VMware や Parralles インスタンス上で Docker Desktop を実行するような、ネストした仮想化でも動くでしょうが、無保証です。詳しい情報は win-running-docker-desktop-for-windows-in-nested-virtualization-scenarios をご覧ください。.
もしもまだインストーラ( Docker Desktop Installer. exe )をダウンロードしていなければ、 Docker Hub から取得できます。ダウンロードは通常「ダウンロード」フォルダ内か、ウェブブラウザ上のダウンロード・バーに表示される最近ダウンロードした場所です。. 確認画面が出たら、 Enable Hyper-V Windows Features (Hyper V の Windows 機能を有効にする)のオプションが、設定ページで選択されているかどうかを確認します。.
インストール後の Docker Desktop は、自動的に起動できません。Docker Desktop を開始するには Docker を検索し、検索結果にある Docker Desktop を選択します。. もしも鯨アイコンが通知エリアから隠れている場合は、タスクバーで「上」を向いた矢印をクリックして表示します。詳しく知るには Docker の設定 を御覧ください。. 初期化が完了すると、Docker Desktop は開始チュートリアルを起動します。チュートリアルには Docker イメージを構築、実行し、Docker Hub にイメージを送信するまでの例を含みます。. Docker Desktop のアンインストールは、ローカルのマシンにある Docker コンテナのイメージを破棄し、アプリケーションによって作成された全てのファイルも破棄します。.
Docker Desktop は、自分で Stable (安定版)リリースと Edge (最新)リリースを切り替え可能です。しかしながら、 Docker Desktop を一度にインストールできるのは、1つのバージョンのみ です。Stable と Edge 版のリリース切り替えるは、開発環境の安定性を損なう可能性があります。特に、新しい(Edge)チャンネルを古い(Stable)チャンネルに切り替える場合です。. 例えば、 Docker Desktop の新しい Edge バージョンでコンテナを作成する場合、Stable に切り戻すと動作しなくなる可能性があります。これは、Edge の機能を使って作成したコンテナには、まだ Stable には反映されていない機能が用いられている場合があるからです。Edge コンテナで作成したり作業したりする場合には、留意し続けてください。.
Edge と Stable バージョン間を安全に切り替えるには、必要に応じてイメージの保存(save)やコンテナの出力(export)を確実に行い、他のバージョンをインストールする前に、既存のバージョンをアンインストールします。詳しい情報については、以下にあるデータの保存と修復を御覧ください。. データ・ボリュームのバックアップと修復の仕方に関する情報は、 データ・ボリュームのバックアップ・修復・移行 を御覧ください。. Docker-docs-ja Guides - ガイド Docker の入手 Get started - 始めましょう Docker で開発 プロダクションでアプリを実行 Product manuals - マニュアル Docker Engine Docker Compose Docker Desktop 概要 Mac Windows Windows に Docker Desktop をインストール インストール前に知っておくこと Windows に Docker Desktop をインストール Docker Desktop のスタート Docker Desktop のアンインストール Stable と Edge バージョンの切り替え 次はどこへ行きますか Windows Home に Docker Desktop をインストール Docker for Windows を始めよう Kubernetes 上にデプロイ Docker Desktop for Windows のネットワーク構築機能 Docker Toolbox の移行 ログとトラブルシューティング よくある質問と回答 [FAQ] Docker for Windows Stable リリースノート Docker for Windows Edge リリースノート Docker Desktop WSL 2 バックエンド ダッシュボード オープンソース・ライセンス Docker Hub Docker Machine Docker Toolbox Docker Registry Docker Swarm Reference - 参考資料 コマンドライン・リファレンス Dockerfile リファレンス Compose file リファレンス 用語集 Samples - サンプル サンプル Docker について リリース・ノート 日本語版について Docker ドキュメント逆引きガイド Docker ドキュメント日本語版 PDF ダウンロード Docs アーカイブ v Docs » Docker Desktop » Docker Desktop for Windows » Windows に Docker Desktop をインストール Edit on GitHub.
Docker Desktop Installer. exe をダブルクリックし、インストーラを起動します。 もしもまだインストーラ( Docker Desktop Installer. exe )をダウンロードしていなければ、 Docker Hub から取得できます。ダウンロードは通常「ダウンロード」フォルダ内か、ウェブブラウザ上のダウンロード・バーに表示される最近ダウンロードした場所です。 2. 確認画面が出たら、 Enable Hyper-V Windows Features (Hyper V の Windows 機能を有効にする)のオプションが、設定ページで選択されているかどうかを確認します。 3. インストール・ウィザードの指示に従い、利用規約(ライセンス)を承諾し、インストーラに権限を与えてインストールを進めます。 4. tar image1 [image tar container を使い、保持したい全てのコンテナをエクスポート(出力)します。Docker Engine コマンドライン・リファレンスの export セクションを御覧ください。 現在のバージョンの Docker Desktop をアンインストールし、異なるバージョン(Stable 又は Edge)をインストールし、仮想マシン・ディスクをリセットします。 docker load -i images.
tar を使い、以前に保存したイメージを再読み込みします。Docker Engine の load を御覧ください。 docker import -i myContainer1. tar を使い、以前にエクスポートしたコンテナに対応するファイルシステム・イメージを作成します。Docker Engine の import を御覧ください。 データ・ボリュームのバックアップと修復の仕方に関する情報は、 データ・ボリュームのバックアップ・修復・移行 を御覧ください。.
0 notes
Text
Hyper v manager download windows 10 home 無料ダウンロード.Windows 10 にHyper-Vの機能をインストールする (Windows Tips)
Hyper v manager download windows 10 home 無料ダウンロード.How to download and install Hyper-v on Windows 10 Home edition

仮想マシンのダウンロード.無料 download hyper-v manager windows 10 をダウンロード - Windows: download hyper-v manager windows 10
Dec 11, · Hyper-V ロールは、Windows 10 Home にはインストールできません。 [設定] > [更新とセキュリティ] > [ライセンス認証] の順に移動して、Windows 10 Home Edition を Windows 10 Pro にアップグレードしてください。 仮想マシンのダウンロード. 現在、仮想マシンのパッケージは 4 つの異なる仮想化ソフトウェア オプション (VMWare、Hyper-V Windows 10 SDK バージョン () Visual Studio ( 年 10 月 9 日時点 無料 hyper-v manager ダウンロード のダウンロード ソフトウェア UpdateStar - » hyper-v manager windows 10 download; Nero 9 is the next generation of the world’s most trusted integrated digital media and home entertainment software suite
Hyper v manager download windows 10 home 無料ダウンロード.無料 hyper-v manager ダウンロード をダウンロード - Windows: hyper-v manager ダウンロード
Dec 11, · Hyper-V ロールは、Windows 10 Home にはインストールできません。 [設定] > [更新とセキュリティ] > [ライセンス認証] の順に移動して、Windows 10 Home Edition を Windows 10 Pro にアップグレードしてください。 仮想マシンのダウンロード. 現在、仮想マシンのパッケージは 4 つの異なる仮想化ソフトウェア オプション (VMWare、Hyper-V Windows 10 SDK バージョン () Visual Studio ( 年 10 月 9 日時点 無料 hyper-v manager ダウンロード のダウンロード ソフトウェア UpdateStar - » hyper-v manager windows 10 download; Nero 9 is the next generation of the world’s most trusted integrated digital media and home entertainment software suite
Hyper-V is a Microsoft-owned Windows Hypervisor platform Type-1 that allows the users to run virtual machines with high performance. However, still, there is a way to easily download, install and enable the Hyper-V feature on Windows 10 Home using the command line.
Here are the simple steps that we can follow to download and install Hypervisor using a Command-line script. There is a code available on Github that allows users to automate the process of downloading and enabling the Hyper-V feature.
Here is that. What we have to do is — Right-click on the Desktop and select Text Document. A new file will be created, now open it and paste the above code in that. After that rename that file to Hyper-V Enabler. Alternative- However, to make all this easy for you, we already have created this bat file that you can download directly using this link.
Once you downloaded or created a Batch file with the given code by yourself on your Desktop. As we run the Batch file, it will open a Command prompt to run the code saved in it. Make sure you have an active internet connection on your system to download files required to install and activate Hyper-V on Windows 10 Home. This will take some time depending upon your network speed. Once the installation is complete, the Hyper-v will automatically get enabled on your system.
Thus, to make changes into effect, the system will ask you to restart it. Simply type Y on your command terminal and press the Enter key. For that, in the search box type- Turn Windows features on or off , as its icon appears, click to open it. There scroll and find -Hyper-V and make sure all its tools are checked as shown in the above screenshot , if not already, and then hit the OK button. Go to Windows 10 Search box again or simply press the Win key on your keyboard and this time type- Hyper-V , click on its icon when appears.
To get a step by step guide you can see our article- How to use hyper-v to install Linux Virtual machine on Windows Hyper-V is not compatible completely with other Type- 2 virtualizers, even though the latest version of Vmware and Virtualbox can run along with it, there will be a huge performance issue.
Thus, if you are planning to use Vmware player or Virtualbox on Windows 10 Home, then first, Deactivate the Hyper-V. If you want then can use a very straight forward method that is either using command prompt or PowerShell command line-.
To make sure the hypervisor feature gets disabled completely, now restart your system. This uninstalls it completely. Or use the command line-. Also See- Hyper-V vs VirtualBox: A basic comparison. Well, this was the quick way to use the Microsoft Windows hypervisor on Windows 10 Home edition. As per your Instructions, i downloaded the. bat file using the link. Once I ran the. bat file as Administrator, it started a CMD window and started running. In the Progress bar, when it reached I need to the Window forcibly.
After this action, restart the System and when i checked the Windows Features, the Hyper-V was not checked, so i checked the Hyper-V Checkbox. But i find the Hyper-V Platform is graded out, means unable to use it. My Question is without the Hyper-V Platform selection, would i be able to work please. No, the Hyper-V feature must be selected in the Windows Features. You can try the command to enable the Hyper-V feature. Maybe it would work. This site uses Akismet to reduce spam. Learn how your comment data is processed.
How To. How to download and install Hyper-v on Windows 10 Home edition. Contents show. Steps to Activate Hyper-v Feature on Windows 10 Home 1. Script to download Hyper v for Windows 10 home. Run Hyper-V Enabler Batch file. Feature installation will start. Restart your Windows 10 System.
Run Hyper-V Manager on Windows 10 home. Create a Virtual Machine. Uninstall or Disable Hyper-V feature on Windows 10 Home 7. Closing thoughts.
Related Posts. Comments 7. SONU KUMAR MAHATO July 22, Reply. does we need to save the file in ANSI format. H2S Media Team July 26, Reply.
No, in. bat format. SHMUOEL damdeker July 28, Reply. Thank you very much from Isreal. Paul LYDON October 26, Reply. how can i download it. H2S Media Team November 3, Reply. By using the given script in the article.
Nagesh KS November 3, Reply.
0 notes
Text
How to activate windows server 2012 r2 foundation 無料ダウンロード.Windows 8.1 and Windows Server 2012 R2 KMS-activation
How to activate windows server 2012 r2 foundation 無料ダウンロード.Activate Windows Communication Foundation (WCF)

Activate WCF for Windows Server 2012 R2.Enable Windows Defender Windows Server r2
Sep 18, · Microsoft has posted the online documentation for the KMS keys for their latest OSes. The KMS keys we’ll be most interested in are these: Windows Server R2 Standard (for most server installs): D2N9P-3P6XR39C-7RTCD-MDVJX. Windows Server R2 Datacenter (for Hyper-V server installs): W3GGN-FT8W3-Y4MJ84CP-Q3VJ9 Apr 17, · See "What changed in Windows Server R2" -> "Windows Defender" on the bottom and you will see: "Available and enabled by default on Server Core installation options and Core System Server (without the user interface). For more information, see Windows Defender." * Hover mouse in the bottom left hand corner to get the start icon or use ctrl+esc or windows key / command key. * Right click anywhere on blank space in the start launch or ctrl+tab. * From the Apps launch start typing "CMD" then right click or arrow key til highlighted and alt+spacebar to get the options to run as administrator
How to activate windows server 2012 r2 foundation 無料ダウンロード.How to Activate Windows Server - Spiceworks
You may choose between the ‘Full’ and ‘N’ editions. The N editions are an excellent alternative if you are looking to save money. They have exactly the same characteristic Feb 02, · Activate Windows Server Evaluation to Full Version. Step 1. The very first step is to view the current edition. So open Command Prompt or Windows PowerShell in elevated mode (Run as Administrator) and type, DISM /online /Get-CurrentEditon as shown below. As you can see the current edition is Datacenter Evaluation. Step s: 3 Apr 17, · See "What changed in Windows Server R2" -> "Windows Defender" on the bottom and you will see: "Available and enabled by default on Server Core installation options and Core System Server (without the user interface). For more information, see Windows Defender."
Add to your cart all the products you want to buy and then use these coupons as it applies to the following quantities of products:. Our helpdesk is ready to help you at any time to install your software and solve any issues you might have with your product. All of our software are ready for instant download. Home Windows PCs Windows 11 Windows 10 Windows 8. hello uniq. software Get Support Contact us. Servers Windows Server Windows Server Windows Server Windows Server R2 Windows Server Windows Server R2 Windows Server Windows Server R2 Windows Server PCs Office Office Office Office Office Office Mac Office Office Office Office Project Project Project Project Project Project Visio Visio Visio Visio Visio Visio PCs Windows 11 Windows 10 Windows 8.
Orders Downloads Product Keys. Windows Server R2 Foundation. Visa Master Card 3DS Bank transfer Bitcoin. The N editions are an excellent alternative if you are looking to save money. They have exactly the same characteristics as the full version, except that these do not include the default Windows Media Player and Windows DVD Maker programs; you have to install them separately in a package that is included in your purchase.
If you're planning on purchasing an N Edition, it is very likely that you will have to perform a clean installation of Windows, thereby reformatting the computer. You cannot simply activate the current installation on your computer, for that you will need a Full Edition. Full Edition. Architecture To install a bit version of Windows, you need a CPU that's capable of running a bit version of Windows. The benefits of using a bit operating system are most apparent when you have a large amount of random access memory RAM installed on your computer, typically 4 GB of RAM or more.
In such cases, because a bit operating system can handle large amounts of memory more efficiently than a bit operating system, a bit system can be more responsive when running several programs at the same time and switching between them frequently.
Office Professional Plus for PC Lifetime. Office Professional Plus. Office Standard. Minimum system requirements. Windows Server R2 Foundation : [Full Edition] [Retail]. Company No. Partner No. BUY ORIGINAL SOFTWARE. Discounts here! If you're not satisfied, you can return it. Visa Master Card American Express Discover JCB Diners Club 3DS Bank transfer Bitcoin.
How to FAQs Contact us Refund Policy Terms and Conditions Privacy Policy. Apply one of this Coupons during the checkout process:.
1 note
·
View note
Text
Install Docker Server 2019

Install Docker Windows Server 2019 Linux Containers
Install Docker On Windows Server 2019
Windows Server 2019 is the next long-term support release of Windows Server, and it's available now! It comes with some very useful improvements to running Docker Windows containers - which Docker Captain Stefan Scherer has already summarized in his blog post What's new for Docker on Windows Server 2019.
UPDATE: the second edition of my book Docker on Windows is out now. It focuses entirely on Windows Server 2019
How to Install SQL Server 2019 on Windows Server. Docker is an open source project – a toolset, really – that was originally designed to assist with the running of containers on Linux operating systems. Wait a minute, what? The words Linux and open source written once again inside a Microsoft book!What is this world coming to? Get Windows Server 2019. You can download the ISO to install Windows Server 2019 now, from.
You need Windows Server to run 'pure' Docker containers, where the container process runs directly on the host OS. You can use the same Docker images, the same Dockerfiles and the same docker commands on Windows 10, but there's an additional virtualization overhead, so it's good to use a Windows Server VM for test environments.
On Windows 10 Docker Desktop is the easiest way to get started
If you want to check out the newest version of Windows Server and get running Docker containers, here's what you need to do.
Get Windows Server 2019
You can download the ISO to install Windows Server 2019 now, from your Visual Studio subscription if you have one, or a 180-day evaluation version if you don't. VMs with Windows Server 2019 already deployed will be available on Azure shortly.
The installation procedure for 2019 is the same as previous Windows Server versions - boot a VM from the ISO and the setup starts. I prefer the core installation with no GUI:
I installed Server 2019 onto a Hyper-V VM running on my Windows 10 machine, with the VM disks stored on an external SSD drive. The setup finished in a few minutes, and it runs very quickly - even with just 4GB RAM allocated.
You can also upgrade from previous Windows Server versions to 2019 using the ISO.
Connect to the Server
When you RDP into a Windows Server Core machine you just see a command prompt. The first time you connect you'll need to set the password for the default Administrator account. Then I like to set PowerShell as the default command shell, so whenever you RDP you get into a PowerShell session:
Configure Windows Features
To run containers you need to enable the Containers feature, and for a non-production VM I also disable Windows Defender to stop it burning CPU cycles. You'll need to reboot after these steps:
Configure Windows Updates
You'll want to make sure you have the latest updates, but then I disable automatic updates so I only get future updates when I want them. There's no GUI in Windows Server Core, so run sconfig and then select:
option 5, to set Windows Updates to manual
option 7, to enable Remote Desktop Access to the server
option 6, to download and install all updates
Then you're ready to install Docker.
Install Docker on Window Server 2019
Windows Server licensing includes the licence cost for Docker Enterprise, so you can run the enterprise edition with production support for containers from Microsoft and Docker.
The latest Docker Enterprise engine is version 19.03 18.03, which you can explicitly install with PowerShell:
Install Docker Windows Server 2019 Linux Containers
This sets up Docker as a Windows Service, which you need to start:
Pull the Windows Base Images
Any Docker containers you run on Windows Server 2019 will be based on Windows Server Core or Nano Server. You'll need both those images, and be aware that the base images are now hosted on Microsoft's container registry, MCR:
These images are tiny compared to the Windows Server 2016 versions. Windows Server Core has shrunk from over 10GB to a 1.5GB download, and Nano Server has shrunk from over 1GB to a 90MB download!
(Optional) Pull the .NET Core Images
The .NET Core team released versions of their SDK and runtime images as soon as Windows Server 2019 launched. You can pull those now and start running your .NET Core apps in 2019 (there are also .NET Framework SDK and ASP.NET images available - hopefully SQL Server will get some attention soon...)
The upstream Docker images are still listed on Docker Hub, so that's where you go for discovery - but they get served from Microsoft's own image registry, MCR.
Try it Out!
Install Docker On Windows Server 2019
I've pushed an updated version of my .NET Core whoami image, so you can try out ASP.NET Core 3.0 running in Windows Server Core 2019 containers:

One of the enhancements for Docker in Windows Server 2019 is that loopback addresses now work, so you can visit this container using localhost on the server, and using the same published port from an external machine:
And in Swarm Mode...
I'll post a longer explanation of what you can do with Docker in Windows Server 2019 that you couldn't do in Windows Server 2016, but here's just one other thing: Windows Server 2019 now supports ingress networking for Docker swarm mode. That means you can run multiple containers on one server, all listening on the same port, and Docker will load-balance incoming requests between the containers.
I have lots more detail on this in my Pluralsight course Managing Load Balancing and Scale in Docker Swarm Mode Clusters
Switch your server to a single-node swarm:
Now deploy the whoami app as a swarm service, with multiple replicas and a published port:
Now when you browse to the VM from outside, Docker will load-balance requests across the five containers which are hosting the service:

There's More
Windows Server 2019 is an evolution to the container functionality you get with Docker. Windows Server 2016 is still perfectly fine for production, but 2019 brings Windows containers much closer to feature parity with Linux containers, and smooths over some things which are tricky in 2016.
And the next big thing is Windows support in Kubernetes, which is expected to GA before the end of the year :) went GA this year. Windows containers are now supported in mixed Linux-Windows Kubernetes clusters - find out more from my post Getting Started with Kubernetes on Windows.
0 notes
Text
Install Docker On Windows 2019

Estimated reading time: 6 minutes
NOTE: Currently not compatible with Apple Silicon (ARM). This project relies on Docker which has not been ported to Apple Silicon yet. If you are running Windows, download the latest release and add the binary into your PATH. If you are using Chocolatey then run: choco install act-cli. If you are using Scoop then run: scoop install act.
Nov 07, 2019 Here’s how you can install Docker on Windows 10 64-bit: Enable Hyper-V in your system. Download Docker Desktop for Windows and open the Docker for Windows Installer file. In the Configuration dialog window, check or uncheck the boxes based on your preferences.
This will install the Docker-Microsoft PackageManagement Provider from the PowerShell Gallery. Sample output is as shown below: Step 2: Install Docker on Windows Server 2019. Once the Containers feature is enabled on Windows Server 2019, install the latest Docker Engine and Client by running the command below in your PowerShell session.
Docker Desktop for Windows is the Community version of Docker for Microsoft Windows.You can download Docker Desktop for Windows from Docker Hub.
By downloading Docker Desktop, you agree to the terms of the Docker Software End User License Agreement and the Docker Data Processing Agreement.
System requirements
Your Windows machine must meet the following requirements to successfully install Docker Desktop.
Hyper-V backend and Windows containers
Windows 10 64-bit: Pro, Enterprise, or Education (Build 17134 or higher).
For Windows 10 Home, see System requirements for WSL 2 backend.
Hyper-V and Containers Windows features must be enabled.
The following hardware prerequisites are required to successfully run ClientHyper-V on Windows 10:
64 bit processor with Second Level Address Translation (SLAT)
4GB system RAM
BIOS-level hardware virtualization support must be enabled in theBIOS settings. For more information, seeVirtualization.
WSL 2 backend
Windows 10 64-bit: Home, Pro, Enterprise, or Education, version 1903 (Build 18362 or higher).
Enable the WSL 2 feature on Windows. For detailed instructions, refer to the Microsoft documentation.
The following hardware prerequisites are required to successfully runWSL 2 on Windows 10:
64-bit processor with Second Level Address Translation (SLAT)
4GB system RAM
BIOS-level hardware virtualization support must be enabled in theBIOS settings. For more information, seeVirtualization.
Download and install the Linux kernel update package.
Note
Docker supports Docker Desktop on Windows for those versions of Windows 10 that are still within Microsoft’s servicing timeline.
What’s included in the installer
The Docker Desktop installation includes Docker Engine,Docker CLI client, Docker Compose,Notary,Kubernetes,and Credential Helper.

Containers and images created with Docker Desktop are shared between alluser accounts on machines where it is installed. This is because all Windowsaccounts use the same VM to build and run containers. Note that it is not possible to share containers and images between user accounts when using the Docker Desktop WSL 2 backend.
Nested virtualization scenarios, such as running Docker Desktop on aVMWare or Parallels instance might work, but there are no guarantees. Formore information, see Running Docker Desktop in nested virtualization scenarios.
About Windows containers
Looking for information on using Windows containers?
Switch between Windows and Linux containersdescribes how you can toggle between Linux and Windows containers in Docker Desktop and points you to the tutorial mentioned above.
Getting Started with Windows Containers (Lab)provides a tutorial on how to set up and run Windows containers on Windows 10, Windows Server 2016 and Windows Server 2019. It shows you how to use a MusicStore applicationwith Windows containers.
Docker Container Platform for Windows articles and blogposts on the Docker website.
Install Docker Desktop on Windows
Double-click Docker Desktop Installer.exe to run the installer.
If you haven’t already downloaded the installer (Docker Desktop Installer.exe), you can get it from Docker Hub. It typically downloads to your Downloads folder, or you can run it from the recent downloads bar at the bottom of your web browser.
When prompted, ensure the Enable Hyper-V Windows Features or the Install required Windows components for WSL 2 option is selected on the Configuration page.
Follow the instructions on the installation wizard to authorize the installer and proceed with the install.
When the installation is successful, click Close to complete the installation process.
If your admin account is different to your user account, you must add the user to the docker-users group. Run Computer Management as an administrator and navigate to Local Users and Groups > Groups > docker-users. Right-click to add the user to the group.Log out and log back in for the changes to take effect.
Start Docker Desktop
Docker Desktop does not start automatically after installation. To start Docker Desktop, search for Docker, and select Docker Desktop in the search results.
When the whale icon in the status bar stays steady, Docker Desktop is up-and-running, and is accessible from any terminal window.
If the whale icon is hidden in the Notifications area, click the up arrow on thetaskbar to show it. To learn more, see Docker Settings.
When the initialization is complete, Docker Desktop launches the onboarding tutorial. The tutorial includes a simple exercise to build an example Docker image, run it as a container, push and save the image to Docker Hub.
Congratulations! You are now successfully running Docker Desktop on Windows.
If you would like to rerun the tutorial, go to the Docker Desktop menu and select Learn.
Automatic updates
Starting with Docker Desktop 3.0.0, updates to Docker Desktop will be available automatically as delta updates from the previous version.
When an update is available, Docker Desktop automatically downloads it to your machine and displays an icon to indicate the availability of a newer version. All you need to do now is to click Update and restart from the Docker menu. This installs the latest update and restarts Docker Desktop for the changes to take effect.
Uninstall Docker Desktop
To uninstall Docker Desktop from your Windows machine:
From the Windows Start menu, select Settings > Apps > Apps & features.
Select Docker Desktop from the Apps & features list and then select Uninstall.
Click Uninstall to confirm your selection.
Important
Uninstalling Docker Desktop destroys Docker containers, images, volumes, andother Docker related data local to the machine, and removes the files generatedby the application. Refer to the back up and restore datasection to learn how to preserve important data before uninstalling.
Where to go next
Getting started introduces Docker Desktop for Windows.
Get started with Docker is a tutorial that teaches you how todeploy a multi-service stack.
Troubleshooting describes common problems, workarounds, andhow to get support.
FAQs provide answers to frequently asked questions.
Release notes lists component updates, new features, and improvements associated with Docker Desktop releases.
Back up and restore data provides instructions on backing up and restoring data related to Docker.
windows, install, download, run, docker, local
Microsoft SQL Server is a database system that comprises many components, including the Database Engine, Analysis Services, Reporting Services, SQL Server Graph Databases, SQL Server Machine Learning Services, and several other components.
SQL Server 2019 has a lot of new features:
Intelligence across all your data with Big Data Clusters
Choice of language and platform
Industry-leading performance
Most secured data platform
Unparalleled high availability
End-to-end mobile BI
SQL Server on Azure
Download SQL Server 2019
Step 1 : Go to https://www.microsoft.com/en-us/evalcenter/evaluate-sql-server-2019.
Install Docker Engine On Windows 2019
Step 2 :To download the installer you need to fill a short form and provide your contact information.
Run the installer
Step 3 :After the download completes, run the downloaded file. Select Basic installation type.
Step 4 :Select ACCEPT to accept the license terms.
Step 5 :Accept the install location, and click INSTALL.
Step 6 :When the download completes, installation will automatically begin.
Step 7 :After installation completes, select CLOSE.
Step 8 :After this has completed, you will have SQL Server 2019 Installation Center installed.
Install SQL Server Management Studio
The steps for installing SQL Server Management Studio are as follows:
Install Docker On Windows Server 2019 Without Internet
Step 9 :Open the SQL Server 2019 Installation Center application
Step 10 :Select installation on the left pane, then install SQL Server Management tools.
Step 11 :Select Download SQL Server Management Studio (SSMS).
Step 12 :After the download completes, click RUN
Step 13 :Then INSTALL
Install Docker On Windows Server 2019 Offline
Step 14 :When installation completes, click CLOSE.
Step 15 :After this has completed, you will have several new software apps installed, including SQL Server Management Studio.
Use SQL Server Management Studio
Step 16 :When you open the SQL Server Management Studio application, you’ll first see a Connect to Server window. This window allows you to establish a connection with the SQL Server instance that you already installed. The Server Name will show instance you installed, and the Authentication will show Windows Authentication. The Server Type is Database Engine.
Install Docker On Windows 2019 Iso
Step 17 :Click the CONNECT button.
0 notes
Text
New Top Features of Windows Server 2016 | Digital Software Market
Get your Microsoft Windows server 2016 at a discounted price from Digital Software Market. Avail of huge discounts on the state-of-the-art software, visit the website to know more...
This blog will help you discover new features of Microsoft windows server 2016. The features listed above are the ones that are mostly going to have an impact on your work.
Nano Server-
Windows Server 2016 has now come up with an updated Nano Server module for building Nano Server images along with more separation of physical host and guest virtual machine functionality. You also get an improved Recovery Console and inbound and outbound firewall including the ability to repair the configuration of WinRMin in addition to that.
Nano instances consume less than 512MB of disk space and less than 256MB of memory, depending on the configuration. This makes a big difference for all virtual machines built on Nano, acting as an infrastructure host installed on bare metal and as a guest operating system running as a virtual machine. New in Technical Preview 3 is the Emergency Management Console, which allows you to view and fix network issues directly from the Nano Server Console.
Hyper-V rolling upgrades-
Upgrading to a new operating system gives out significant challenges in many respects. Earlier versions of Windows Server did not allow you to upgrade without stopping the cluster. This can be a serious problem for production systems that normally run continuously. In many cases, the workaround was to launch a new cluster running the updated operating system and then migrate the workload from the old cluster. Of course, this required entirely new hardware. Microsoft Windows Server 2016 supports the rolling cluster upgrades from previous Windows Server 2012 R2. This means you can perform these upgrades without stopping your cluster or migrating to new hardware. This process is similar in that all active roles on individual nodes in the cluster must be moved or removed to another node in order to upgrade the host operating system. The difference is that all members of the cluster continue to operate at the Windows Server 2012 R2 functional level (upgraded from the old host) until all hosts run the new operating system and explicitly upgrade the cluster's functional level.
PowerShell Updates-
PowerShell keeps receiving updates with each new release of the operating system. Windows Server 2016 displays several new PowerShell cmdlets that focus on specific features. You can also use PowerShell commands to see the differences between new releases. The PowerShell cmdlet Get-Command returns a list of commands that you can send to a file for further processing.
The new cmdlets covered include 21 DNS-related commands, 11 Windows Defender, 36 Hyper-V, 17 IIS management, and 141 network controller-related commands. Another major driving force for PowerShell in this release is related to the Desired State Configuration (DSC). Microsoft has done a lot of work to make DSC the first tool to configure and maintain not only Windows Server, but also Linux servers. With the introduction of the new package manager service, OneGet, there are many new possibilities driven by PowerShell.
Networking Enhancements-
Convergence is a buzzword here, with new features that help businesses and hosting providers merge traffic from multiple tenants to reduce the number of network interfaces. This may reduce the number of network ports required by half. Another new feature is called Packet Direct. It focuses on increasing the efficiency of the entire workload and including everything from small packets to large data transfers.
Technical Preview 3 includes a new server role called Network Controller. It provides a central point for monitoring and managing network infrastructure and services. Other extensions that support software-defined network capabilities include an L4 load balancer, an extended gateway for connecting to Azure and other remote sites, and an integrated network fabric that supports both RDMA and tenant traffic.
Storage Spaces Direct-
Windows Server 2016 Technical Preview 2 takes the storage space one step further and has the ability to build a highly available storage system using only the disks directly attached to each node. Restoring force between nodes uses the network and the SMB3 protocol. This new feature, called Storage Spaces Direct, continues to support older SATA-based hardware while leveraging newer hardware such as NVMe SSDs. At least four nodes must be available to create a cluster using Storage Spaces Direct.
ReFS as a Primary File System-
The Resilient File System (ReFS) is another feature introduced in Windows 8 and Windows Server 2012. ReFS was designed from the beginning to be more resistant to corruption than previous versions and bring many advantages to the NTFS on-disk format. Microsoft has enhanced both the usefulness and importance of ReFS in Windows Server 2016 TP2 by making the file system suitable for Hyper-V workloads.
This has a significant impact on Hyper-V performance. To get started, you should see a new virtual machine with a fixed size VHDX created about as fast as pressing return. The same benefits apply to creating checkpoint files and merging VHDX files created during backup creation. These features are similar to what ODX (Offload Data Transfers) can perform on large storage appliances.
Source URL:- mdigitalsoftware.medium.com/new-top-features-of-windows-server-2016-digital-software-market-15c4f2b4a3fc?postPublishedType=initial
0 notes